Sourdough is one of the most popular bread to make, but making it look perfect can be a challenge.
Without proper knowledge of how to shape and rise sourdough, your loaves may end up looking less than ideal.
Fortunately, with a few simple tips and tricks, you can start shaping sourdough loaves of all shapes and sizes!
Contents
How To Make The Shape of Sourdough Better?
1. Creating the Perfect Dough Ball
The first step in achieving the perfect sourdough shape is to create the perfect dough ball. In order to do this, you’ll want to ensure that your dough is properly hydrated.
Too much water will create a sticky mess while too little will result in a stiff and crumbly ball that won’t hold its shape.
Once you have achieved the right balance between wetness and dryness, begin by folding your dough into itself until it forms a tight round ball.
Make sure there are no air bubbles or pockets inside the ball – these can cause irregularities in your final product.
After forming the dough into a tight ball, place it on an oiled surface so it doesn’t stick as you shape it.
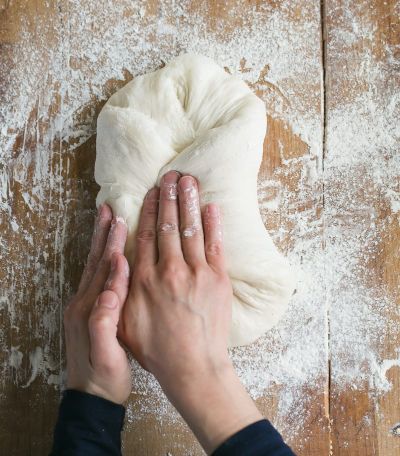
2. Shaping Your Loaf
Once you have created your dough ball, it’s time to begin shaping!
- Start by gently pressing down on your dough with both hands until it forms an oval-shaped disc about one inch thick.
- Next, fold each side of your disc inward towards the center until they meet at a seam in the middle.
- Then use both hands to roll the sides inward towards each other until they form two long rolls with a seam down their center line.
Finally, place your loaf onto an oiled baking sheet or parchment paper lined baking sheet and allow it to rise before baking!
3. Proper Baking Techniques
In order for sourdough bread to achieve its desired texture and flavor profile, it must be baked correctly.
To do this, preheat your oven to 500 degrees Fahrenheit before placing your shaped loaf inside for 20 minutes with steam added for additional crispness on top.
Once done baking for 20 minutes reduce heat to 350 degrees Fahrenheit for 30 minutes more with steam added throughout baking time if desired.
Lastly, turn off the oven heat after 30 minutes and leave the bread inside the oven with the door closed for 10-15 minutes or until desired crustiness has been achieved!
Why Is My Sourdough Spreading Out?
For some people, the main challenge when baking sourdough is getting their loaves to keep their shape and not spread out.
This can be caused by a few different factors, such as a lack of proper hydration in the dough or over-handling the dough during shaping sourdough.
If you’re experiencing this issue, try rehydrating the dough by adding more water or increasing the amount of time you let it rest before shaping.
You may also want to try using a baking stone for extra support in keeping your loaf’s shape, as well as reducing the amount of handling during shaping sourdough.
How Long Should Sourdough Rest Before Shaping?
When it comes to sourdough, the amount of time you let your dough rest before shaping will depend on a few factors.
Generally speaking, if you’re using an active starter in your recipe, you should aim for at least 3-4 hours of resting time; while inactive starters can often be shaped as soon as they’re mixed together.
For best results, let your dough rest for a minimum of four hours if possible, but the longer you’re able to let it rest, the better the flavor will be in the end!
What Can I Use to Shape Sourdough?
In order for your dough to be properly shaped, you will need a few tools and techniques. But don’t worry—it’s easier than it sounds!
1. Tools for Shaping Sourdough:
The most important tool for shaping sourdough is a bench scraper. This tool helps you quickly transfer the dough from your countertop to a baking tray or sheet pan.
A bench scraper is also helpful when you need to divide the dough into smaller pieces or shape sourdough into loaves or rolls. You will also want to have a sharp knife on hand for scoring the top of your loaf before baking it.
This helps release steam during baking and adds texture and character to the surface of your bread.
Finally, make sure you have some parchment paper available so that you can easily transfer the dough onto your baking tray or sheet pan without sticking or tearing apart.
2. Shaping Techniques for Sourdough
Once you have all of your tools in place, you are ready to start shaping sourdough!
- If you are making a round loaf of sourdough, start by gently stretching out one side of the dough with both hands until it has stretched out into an elongated oval shape.
- Then, use both hands to gently roll up the oval from one end until it forms a tight cylinder shape.
- Next, press down lightly on either end of the cylinder with both hands in order to form two points at either end of the loaf (called “ears”).
- Once these steps are complete, carefully transfer the loaf onto a parchment-lined baking tray or sheet pan, being sure not to disturb its shape too much.
- Finally, score three diagonal lines across the top with a sharp knife and bake as usual!
What Does a Perfect Sourdough Look Like?
When your sourdough is done baking, it should have a golden brown crust and appear slightly fluffy.
The inside of the loaf should feel light and airy, with an even crumb throughout. The bottom of the loaf should also be slightly crispy and not doughy in texture.
Finally, the score lines you made before baking will form a distinct pattern and should be visible on the top of your finished loaf.
Why Can’t I Shape My Sourdough?
If your dough is too sticky or wet, it can be difficult to shape. This may be due to a number of factors, including the environment you are baking in and the ingredients used in your recipe.
If this is the case for you, try rehydrating the dough by adding more water or increasing the amount of time you let it rest before shaping.
Make sure you have the right tools and techniques in place and you’ll be able to create perfect loaves every time!
Can You Shape Sourdough From the Fridge?
Yes, you can shape sourdough from the fridge.
In fact, this method is preferred by many bakers as it helps to develop a better flavor and texture in the finished loaf.
When shaping sourdough that has been refrigerated, it’s important to take the time to knead it thoroughly until it reaches room temperature.
This will help to ensure your dough is elastic enough to hold its shape when it’s being shaped.
What Happens if You Don’t Stretch and Fold Sourdough?
Stretching and folding is an important steps in the process of shaping sourdough.
If you don’t stretch and fold your dough before baking, it may not develop as much gluten structure as necessary to hold its shape once it’s been shaped.
As a result, your loaf may not rise any further or have a poor texture.
Should You Slap and Fold Sourdough?
Slapping and folding is an optional steps in the process of shaping sourdough.
It involves stretching out the dough with one hand, then using the other hand to slap it back down into a ball shape.
This helps to create more tension in the dough, which can help to shape your loaf better.
However, slapping and folding can be quite messy, so if you don’t want to make a mess, it’s best to stick with traditional stretching and folding.
How Many Times Should You Knead Sourdough?
The amount of kneading needed for sourdough depends on the type of dough you are making.
If you are making lean dough (such as pizza or focaccia), then you should knead it between four and eight times.
If you are making a richer, higher-hydration dough (such as ciabatta or baguette), then you should knead it up to 10 times.
Finally, if you are making a very wet dough (such as brioche or challah), then you can knead it up to 15 times or even more.
Why Won’t My Sourdough Hold Its Shape?
If your sourdough is not holding its shape, then it might not have enough gluten structure. This could be due to a lack of kneading or a lack of stretching and folding before baking.
To remedy this, try kneading the dough longer and/or adding more stretching and folding steps into your shaping routine.
Conclusion:
Shaping sourdough may seem intimidating at first but it’s actually quite simple once you get familiar with some basic shaping techniques and tools!
All you need is a bench scraper, parchment paper, and a sharp knife—and maybe some practice!
With these tools and techniques in hand, anyone can become an expert at shaping beautiful loaves of sourdough bread that look just as good as they taste! So grab those tools and get started today!
Amazon and the Amazon logo are trademarks of Amazon.com, Inc, or its affiliates.
