Have you ever proofed your dough for too long and it has become too soft and sticky?
If so, don’t worry! There are several ways to fix over-proofed dough.
With a few simple steps, you can get your dough back to its original consistency and be ready to bake in no time.
Contents
Can I Fix Over-Proofed Dough?
Here is a step-by-step guide to fix an over-proofed dough:
- The first step is to knead the dough back into shape. Kneading will help redistribute the yeast throughout the dough and give it more structure.
- Be sure not to over-knead, as this will lead to a tough texture. Once you have kneaded the dough, let it rest for 10 minutes before continuing.
- Next, you need to let the dough rise again. This time, however, you will need to keep an eye on it and make sure it does not become over-proofed again. You can do this by setting a timer or simply checking on the dough every few minutes until it reaches its desired size.
- Once the second rise is complete, then you can move on to shaping your dough into whatever form is needed for baking.
- Finally, if your recipe calls for pre-baking (such as in pizza crusts or focaccia bread) make sure that your oven temperature is hot enough so that the outside of the bread cooks quickly while leaving the inside moist and chewy.
- Pre-baking can help give your bread structure and prevent over-proofing during its final rise in the oven.
What is Over-proofed Dough?
When baking with yeast, the proofing process involves letting the dough rise as a result of fermentation by the yeast. The ideal amount of proofing will vary depending on the type of bread and humidity levels in your kitchen.
However, if your dough proves too long, it can become an over-proofed dough.
Over-proofed dough has risen too much and appears bubbly or porous. This means that some of its structure has been lost due to excessive fermentation.
When baked, this type of dough won’t rise much and often results in a dense texture with a lack of flavor.
Additionally, since there is no support for the gluten strands in an overproofed loaf, it may collapse when taken out of the oven.
How Can You Tell if Your Dough Is Overproofed?
If your dough has risen more than twice its original size or looks overly puffy even after a few minutes of kneading it back down, then it’s likely been over-proofed.
If you cut into an over-proofed loaf before baking and notice large bubbles inside that are visible to the naked eye, then it’s definitely been left to rise for too long and should be discarded immediately.
Another way to check if your dough is over-proofed is by gently stretching it out—if it breaks apart easily without any resistance or springiness then chances are good that it’s been left for too long!
How Does an Over-Proofed Dough Taste Like?
Unfortunately, an over-proofed dough can have a very unpleasant taste. This is because the yeast has been left to ferment for too long, resulting in an overly sour flavor that may overpower other ingredients such as spices or herbs.
Additionally, due to its lack of structure, the texture of an over-proofed loaf tends to be dense and gummy.
The crust will also be soft and may even stick to the pan due to the absence of support from the gluten strands.
How Is Long Too Long for the Dough to Proof?
The ideal proofing time for your dough will vary depending on the specific recipe as well as the temperature and humidity in your kitchen.
Generally speaking, you should aim to complete the proofing process within 2-3 hours if possible.
If you let it go too long, then chances are good that you will end up with an over-proofed dough that will not rise as much when baked and may have an off-putting flavor.
To prevent this from happening, you should keep a close eye on your dough and set a timer to make sure it does not overproof.
Additionally, if you knead the dough back down after it has risen and then let it rest again, you can extend the proofing time without risking over-proofing.
Ultimately, if you want your bread to turn out perfect every time then it’s best to keep an eye on it and adjust the proofing time accordingly.
Should Proofed Dough Bounce Back?
Proofed dough should have a slight bounce back when touched. This is an indication that the gluten has been developed enough to hold its structure while baking, allowing the loaf to rise properly in the oven.
If your dough doesn’t bounce back and instead stays flat or appears gummy then it is likely over-proofed and should be discarded.
You can also try to knead it back down and let it rest for a few minutes before checking again, but if the dough doesn’t recover then it’s best to start over with a new batch.
Overall, proofing your dough properly is essential for achieving perfect loaves every time! Keep an eye on the clock and don’t let your dough overproof to ensure delicious results.
How Do You Know if Your Dough Is Overkneaded?
Over-kneading your dough can be just as detrimental as over-proofing it.
This is because kneading the dough too long and hard will cause gluten strands to break down, resulting in a tough and dense loaf with little or no rise.
To tell if your dough has been over-kneaded, you should take a small piece and gently stretch it out.
If it breaks apart easily or doesn’t have any springiness then your dough has likely been kneaded for too long and you should start over with a new batch.
Additionally, the over-kneaded dough may appear drier than usual due to the excess gluten strands being broken down.
How Do You Tell if the Dough Is Thoroughly Kneaded?
Here’s how you can tell if the dough is thoroughly kneaded:
• Use the windowpane test: gently stretch a small piece of dough to see if it stretches into a thin, transparent sheet without breaking.
• Look for a smooth and elastic texture when kneading the dough; it should form a cohesive mass without any lumps or cracks.
• The dough should be slightly tacky to the touch but not overly sticky.
• When pressing down on the dough, it should bounce back quickly.
• Pinch off a small piece of dough and roll it between your fingers; you should not feel any coarse particles or large air pockets in the dough.
• To check for the evenness of kneading, examine the sides of the loaf of bread; look for an even crumb pattern instead of large chunks or pockets.
• Another way to tell if the dough is thoroughly kneaded is to tap it lightly with your knuckles; you should hear a hollow sound if it’s ready.
Will Overworked Dough Rise?
The short answer is yes, overworked dough will still rise. However, it may not rise as much as it would have if you did not knead it too much or let the proofing time go beyond two hours.
Overworking your dough can damage the gluten strands and prevent them from developing correctly, resulting in a loaf that is dense and not as light and fluffy.
Additionally, over-kneaded dough can be more difficult to shape, leading to an uneven loaf with irregular pockets of air.
To prevent this from happening, you should knead the dough until it passes the windowpane test and then set a timer for the proofing time so that you don’t risk over-proofing the dough.
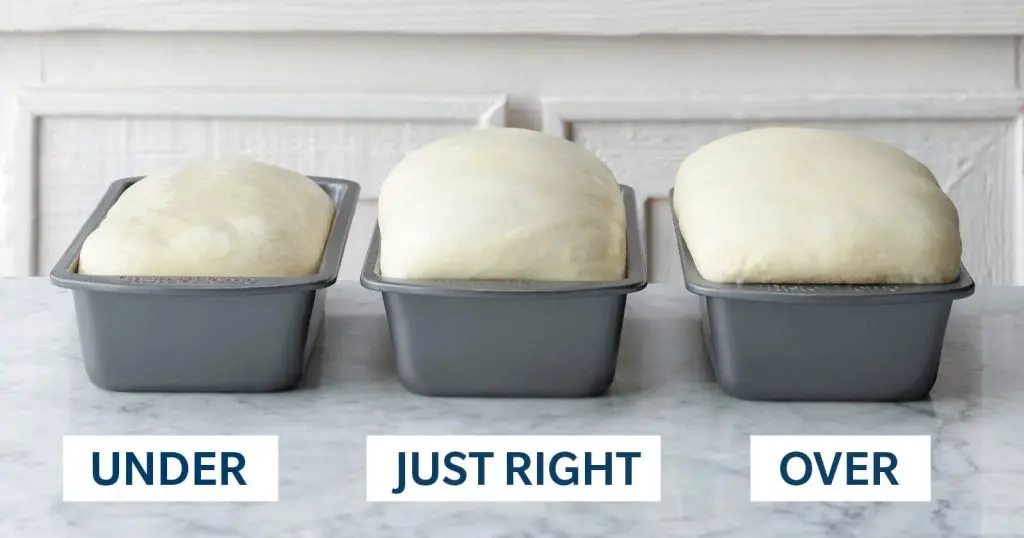
How Do You Tell if Bread Is Overproofed or Underproofed?
One of the most important steps in the bread-making process is proofing, which involves allowing the dough to rise in order to give it flavor and texture.
But how do you know if your dough has been over-proofed or under-proofed? Let’s take a look.
1. Signs of Over-Proofed Dough:
The most obvious sign that your bread has been overproofed is that it will have a very flat top, as well as depressions in the top crust.
The texture of the bread will also be overly soft and gummy. This can happen when the dough rises for too long, or when it’s allowed to rise at too high a temperature.
Another sign of over-proofed dough is that it can be seen after baking — an overly moist crumb due to excess steam released during baking.
2. Signs of Under-proofed Dough:
On the other hand, under proofed bread will not rise enough before being baked and will end up with a dense texture.
You may also notice large air pockets within the loaf that were created by insufficient fermentation time or yeast activity.
The crust may also appear pale and dry because it hasn’t had enough time to caramelize during baking.
3. How To Avoid Over/Under Proofing
The best way to prevent either over- or under-proofing is to follow your recipe closely and be aware of what your dough should look like throughout each step in the process.
- Pay attention to rising times and temperatures, use an accurate thermometer if necessary, and make sure that your yeast is fresh and active before using it in your recipe.
- Also, keep an eye on how your dough looks during kneading — it should become elastic but still feel slightly tacky when you touch it — as this will indicate how well it is rising later on.
- Finally, use sharp scissors or a razor blade to score loaves right before they go into the oven — this gives them room to expand while also creating lovely patterns on their surface!
By paying attention to clues such as shape and texture while proofing your dough, you can figure out whether you have over- or under-proofed it so that you get delicious results every time! With practice comes perfection! So don’t give up—keep trying until you get it right! Happy baking!
Conclusion:
Over-proofed dough is not a lost cause! With some simple steps like kneading, rising again with careful monitoring, and pre-baking if necessary, you can fix over-proofed dough so that it is ready for baking once more.
With these tips in mind – plus a little patience – you’ll be able to create delicious baked goods without any hassle. Happy baking!
Amazon and the Amazon logo are trademarks of Amazon.com, Inc, or its affiliates.
