If you have fresh herbs in your garden or at the store and don’t want them to go to waste, drying your herbs is a great way to preserve them for later use.
Many people use a dehydrator to dry their herbs, but did you know that you can also use an air fryer?
Read on as we explain how easy it is to dry herbs in an air fryer.
Contents
Drying Herbs in An Air Fryer:
Here is a step-by-step guide on drying herbs in an air fryer:
1. Preparing Your Herbs
Before you begin the drying process, make sure that your herbs are clean and dry.
If you harvested the herbs from your garden, gently wash them with water and pat them dry with a paper towel or kitchen cloth.
Once they are clean and dry, remove any stems or leaves that appear wilted or discolored.
2. Prepare The Air Fryer:
Next, line your air fryer basket with parchment paper so that the herbs do not stick to the bottom of the basket during the drying process.
3. Put Herbs in The Air Fryer:
Spread out your prepared herbs evenly over the parchment paper-lined basket and then place it into preheated air fryer at 180°F for 15 minutes.
After 15 minutes have passed, check on your herbs to see if they are completely dried out.
If they are still slightly damp, heat them for another 5 minutes until they are completely crisp and dried out.
Why You Should Be Drying Herbs in an Air Fryer:
Let’s take a look at why you should be drying herbs in an air fryer.
1. The Benefits of Drying Herbs in an Air Fryer
When drying herbs in an air fryer, you get all the benefits of fresh-dried herby flavor without any of the hassle associated with oven-drying or other methods.
- The main benefit of using an air fryer is that it evenly distributes heat which ensures your herbs are dried out evenly and efficiently.
- This also prevents burning or over-drying, which can happen if you’re not careful.
- Additionally, since the process only takes about 10 minutes, it saves time when compared to traditional methods such as oven drying which can take hours.
- Another benefit of using an air fryer is that it helps preserve the essential oils found in many herbs. These essential oils are what give herbs their unique flavors and aromas, so preserving them is paramount if you want flavorful dried herbs!
- Additionally, since air frying requires very little oil (or none at all), it helps keep your kitchen clean and tidy by reducing messes from splatters and spills.
Dehydrating vs Drying Herbs in an Air Fryer
Let’s take a closer look at the differences between dehydration and drying when it comes to preserving herbs using an air fryer.
1. How Dehydration Works
Dehydration is the process of removing moisture from food. It helps preserve the food for longer periods of time by reducing the water content so that bacteria cannot grow.
When it comes to herbs, dehydration involves heating them to a temperature that removes most of their moisture without destroying their flavor and nutritional value.
The key benefit of dehydrating herbs in an air fryer is that it preserves their color, texture, aroma, and flavor better than other methods—including traditional ovens—and requires less energy.
2. How Drying Works
Drying is a more complex process than dehydration because it also involves exposure to air.
This type of preservation technique works by exposing food to low humidity levels over a period of time until all its moisture has been removed.
A well-ventilated room or cabinet can be used to dry herbs but using an air fryer can speed up the process significantly while still preserving their quality.
The benefit here is that you can have perfectly dried herbs within minutes using minimal energy compared to traditional methods which can require hours or days depending on how much moisture needs to be removed from your herbs.
Other Ways to Dry Herbs:
Fortunately, there are several ways you can preserve them without having to dehydrate them. Let’s explore how!
1. Freezing Herbs
One of the most popular methods is freezing herbs in oil or butter. This method works best with soft herbs such as basil, parsley, chives, oregano, and tarragon.
- To freeze your herbs this way, simply chop them finely and mix them with a bit of melted butter or oil (olive oil is the best option).
- Once mixed together, pour the mixture into an ice cube tray and freeze for a few hours until solid.
- The cubes can then be transferred to a freezer bag for easy storage and use later on.
2. Preserving Herbs In Salt
Another great method of preserving fresh herbs is by drying them in salt.
- To do this, you will need coarse kosher salt and either thyme, rosemary, oregano, sage, or bay leaves (or any combination of these).
- Begin by washing the herbs thoroughly and patting them dry with paper towels.
- Next, spread out the salt in an ovenproof dish and place the herbs on top of it.
- Then cover everything with more salt so that all of the leaves are completely covered with salt.
- Bake at 200 degrees Fahrenheit for about 3-4 hours until completely dry before transferring them to airtight containers for storage.
2. Making Herb Vinegars
Finally, you can also preserve your herbs in vinegar without having to dehydrate them first!
- To do this you will need some high-quality white vinegar (apple cider vinegar also works) as well as whatever herb you’d like to use (such as rosemary, thyme, or oregano).
- Start by bringing 2 cups of vinegar to a boil and adding 1/4 cup of dried herb sprigs or 2 tablespoons of freshly chopped herbs into it.
- Reduce heat until simmering and allow it to simmer for 15 minutes before removing from heat and allowing it to cool completely before straining out the solids using cheesecloth or a fine mesh strainer and transferring it into sterilized bottles/jars for storage.
How to Dry Basil in Air Fryer?
Basil is a popular herb that can be dried in an air fryer.
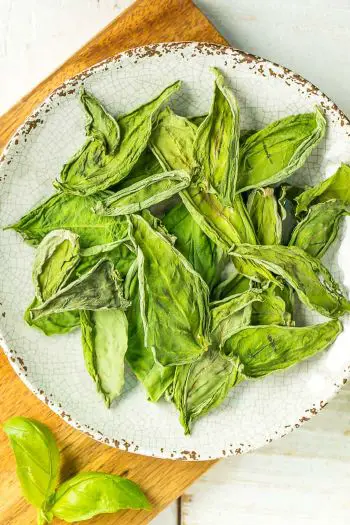
- Begin by washing the basil leaves and patting them dry with paper towels.
- Next, place the basil leaves in the air fryer basket in a single layer and season with salt, pepper, or whatever other seasoning you’d like to use.
- Set the air fryer to the lowest temperature setting (around 200 degrees Fahrenheit) and cook for about 15 minutes.
- Once the leaves are dry and crunchy, allow them to cool before transferring them to an airtight container for long-term storage.
How to Store Air Fryer Dried Herbs?
When it comes to storing air fryer-dried herbs, the key is to make sure they are completely dry and free from moisture.
Store in an airtight container or jar in a cool, dark place away from direct sunlight.
To maximize shelf life, try using silica gel packets which absorb any excess moisture and keep your herbs fresh for longer.
How Can You Use Air Fryer Dried Herbs:
Once your herbs are dried out, they are ready to use!
You can use these herbs in any recipe that calls for dried herbs – just remember that since these are freshly dried, they will be stronger than store-bought ones.
Start by using half as much as what is called for in a recipe; you can always add more later if needed!
To get started with some recipes, try making some herbed breadcrumbs or adding some extra zing to your roasted vegetables with a sprinkling of oregano or thyme. The possibilities are endless with air fryer-dried herbs!
Air fryer dried herbs can be used in just about any recipe that requires dried herbs.
From soups and stews to salads, pasta, and pizzas, the possibilities are endless!
For maximum flavor and aroma, add your air fryer-dried herbs towards the end of cooking time to preserve their quality.
Conclusion:
Drying herbs in an air fryer is one of the most efficient ways to preserve fresh herby flavor without sacrificing quality or succumbing to long drying times associated with traditional methods like oven-drying.
Not only does this method save time by only taking about 10 minutes compared to hours for oven-drying but it also helps preserve essential oils found within many types of herbs—which gives them their unique flavors and aromas—and requires very little oil or none at all!
To get started on this simple process all you need are some fresh herb sprigs (such as rosemary or thyme), paper towels, scissors/kitchen shears, a cutting board (optional), parchment paper/non-stick baking sheet (for lining basket), and preheated air fryer set at 350°F/177°C degrees.
Both dehydration and drying have their own set of benefits when it comes to preserving your favorite herbs with an air fryer; however, dehydrating tends to preserve more flavor and nutrition while drying requires less energy and time overall.
No matter which method you choose for preserving your harvest, both are sure to leave you with delicious results!
Amazon and the Amazon logo are trademarks of Amazon.com, Inc, or its affiliates.
