Mrs. T’s Pierogies are a classic favorite for many families, but air frying them can take them to the next level!
Air frying is a great way to get that crispy texture without having to use too much oil.
In this blog, we will be walking through the steps on how to cook Mrs. T’s frozen pierogies in air fryer and how to store and serve them.
Contents
How to Cook Mrs. T’s Frozen Pierogies in Air Fryer?
Here’s a step-by-step guide on how to cook Mrs. t’s frozen pierogies in air fryer:
1. Ingredients
You will need one package of Mrs. T’s Frozen Pierogies (you can choose from cheese, potato & onion, or sauerkraut).
You will also need two tablespoons of olive oil or cooking oil of choice and some salt and pepper for seasoning (optional).
2. Step-by-Step Process:
Step 1: Preheat your air fryer to 375°F for about three minutes. This will ensure that your pierogies come out nice and crispy!
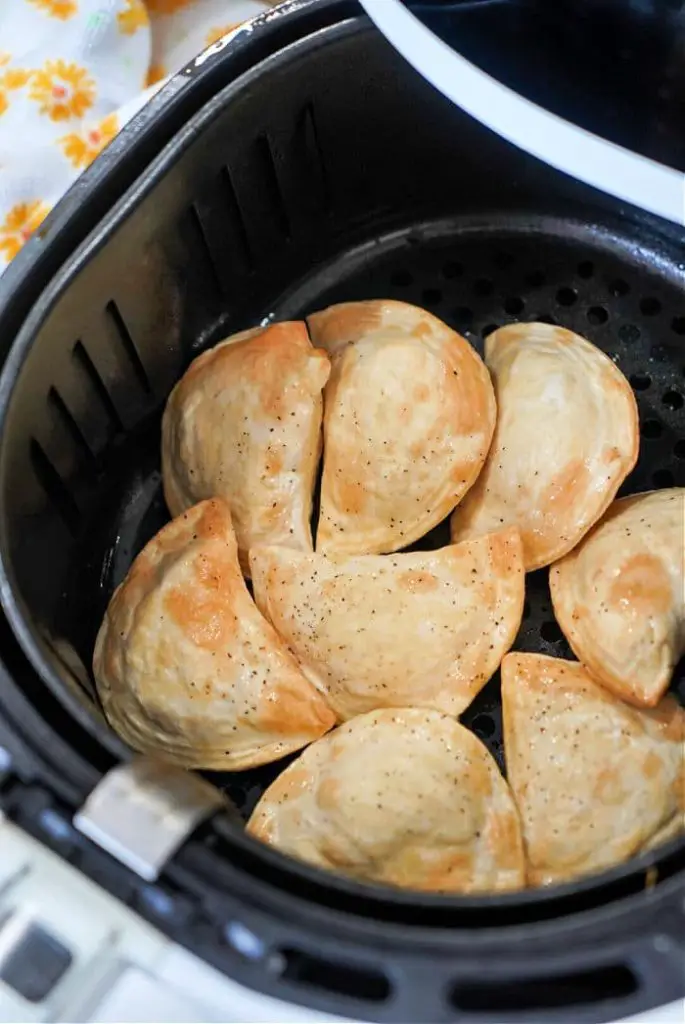
Step 2: Place the pierogies into the basket of your air fryer. Make sure they’re not overcrowded and that there is enough space between each one so they cook evenly.
Step 3: Set the timer for 10-12 minutes, depending on how crispy you like them. If you want them extra crispy, you can set them for 12 minutes.
Step 4: Once the timer goes off, carefully remove the basket from your air fryer and transfer the pierogies onto a plate or bowl. Enjoy while still hot!
Step 5 (Optional): If you want to give your pierogies an extra kick of flavor, try sprinkling some Parmesan cheese over top before serving!
How Long To Cook Frozen Pierogies in the Air Fryer?
Here is how long to cook frozen pierogies in the air fryer according to the different sizes of the pierogi:
| Size of Pierogi | Cooking Time | Temperature |
|---|---|---|
| Small (3-4 inches) | 4–5 minutes | 375°F |
| Medium (4-5 inches) | 6–7 minutes | 375°F |
| Large (5-6 inches) | 8–10 minutes | 400°F |
For best results, preheat the air fryer to the specified temperature before cooking pierogies.
The size and shape of pierogies will also affect cooking time, so some pieces may need to be moved around for even cooking.
It is recommended to check doneness after the minimum amount of time listed above, and then add additional time if needed.
Additionally, try adding a teaspoon of oil to pierogies prior to cooking to help them crisp up more.
How Long Do Frozen Pierogies Last?
Frozen pierogies can last up to 3 months in the freezer.
To maximize their shelf life, make sure they are stored in an airtight container or bag and kept away from any sources of heat.
When ready to cook, thaw them in the refrigerator before cooking them in the air fryer as directed above.
What to Serve With Air Fryer Mrs. T’s Frozen Pierogies?
Thinking about what to serve with air fryer Mrs. t’s frozen pierogies? Here are 5 Delicious Sides to Serve:
1. Caramelized Onion & Spinach Salad:
This simple salad pairs perfectly with pierogies as it is light and fresh yet still packs plenty of flavor from the caramelized onions.
Plus, it can be prepared in advance, making it ideal for busy weeknights when cooking time is limited.
For this salad, simply sauté sliced onions until lightly golden brown then toss them together with fresh spinach leaves and a drizzle of olive oil or balsamic vinegar for added flavor.
2. Roasted Vegetables:
Another great side dish to serve with air fryer Mrs. T’s frozen pierogies is roasted vegetables.
Simply preheat your oven to 425°F and spread your favorite vegetables on a baking sheet lined with parchment paper (we recommend bell peppers, zucchini, squash, and mushrooms).
Then season the vegetables with salt & pepper before roasting in the oven for 25-30 minutes or until they are tender and lightly browned on the edges.
3. Garlic & Herb Mashed Potatoes:
For an easy yet flavorful potato side dish that will stand up to the flavors of your pierogies, try garlic & herb mashed potatoes!
All you need to do is boil potatoes until they are tender then mash them together with butter and herbs such as parsley or thyme before seasoning them to taste with salt & pepper.
These potatoes go great alongside any type of pierogi – cheese-filled or potato filled – so feel free to get creative!
4. Sauteed Kale & Mushrooms:
For a healthy veggie option that won’t overpower the flavors of your pierogies, try sautéing kale and mushrooms together in olive oil over medium heat for 3-4 minutes until tender yet still slightly crisp on the edges.
This side dish pairs well with any type of pierogi filling – from cheese-filled varieties to meat-filled varieties – so don’t be afraid to experiment!
5. Baked Beans:
Last but not least, baked beans make a great accompaniment to air fryer Mrs. T’s frozen pierogies thanks to their smoky flavor and hearty texture that stands up well against the softness of the cooked dough on the inside of each pierogi pocket.
You can make homemade baked beans easily by simmering navy beans in tomato sauce with spices such as paprika or chili powder before transferring everything into an ovenproof dish and baking at 350°F for 30-35 minutes until bubbly and golden brown around the edges.
How to Store Air Fryer Mrs. T’s Frozen Pierogies?
The most important part of properly storing your pierogies is making sure that they stay cold until you’re ready to cook them.
As such, it’s best to keep them in the freezer at all times until you need them. Make sure that your freezer remains at 0°F (or -18°C) or below for the best results.
If you plan on storing your pierogies for longer than two months, it might be a good idea to double-wrap them in plastic wrap or aluminum foil before placing them in the freezer. This helps preserve their flavor and texture for longer periods of time.
Additionally, it’s important to write down the date when you freeze your pierogies so that you know when they should be used by—frozen foods tend to lose their freshness over time.
Tips to Cook the Perfect Air Fryer Mrs. T’s Frozen Pierogies:
To ensure that your pierogies are cooked to perfection, here are some tips for cooking them in an air fryer.
- First and foremost, it is important to preheat the air fryer before populating it with your pierogies. This will ensure that the pierogies cook evenly and at the temperature needed for optimal results.
- Once the air fryer is preheated, simply place the frozen Mrs. T’s Pierogies onto the wire basket or tray of your air fryer, making sure not to overcrowd them so that they can cook more efficiently.
- Be sure to shake or flip the pierogies halfway through their cooking time in order to achieve even heating and crispness throughout all surfaces of the product.
- When done cooking, remove them from the air fryer basket with tongs or a spoon as they may be quite hot!
Conclusion:
Cooking Mrs. T’s frozen pierogies in an air fryer is an easy and delicious way to enjoy this classic favorite!
With just a few simple steps, you can have crispy and delicious pierogies in no time at all.
Be sure to preheat your air fryer for optimal cooking results and don’t forget about those optional toppings – Parmesan cheese adds a lovely flavor twist!
There are so many delicious sides you can serve alongside air fryer Mrs. T’s frozen pierogies! From salads to roasted veggies, mashed potatoes, sautéed kale & mushrooms, or even baked beans; these dishes all provide plenty of flavor without overpowering the delicate taste of these delicious little dumplings!
Storing frozen Mrs. T’s Pierogies is simple but requires special attention due to their delicate nature—be sure that they remain at 0°F (or -18°C) or below until ready for use!
Once cooked inside an air fryer, these delicious treats are easy as pie and perfect for a quick snack or dinner option! Enjoy!
Amazon and the Amazon logo are trademarks of Amazon.com, Inc, or its affiliates.
