Chicken livers are a delicious and nutritious dish that can be enjoyed in many ways. But if you’re looking for a healthier alternative, air frying is the way to go.
Air-frying chicken livers give them a golden, crispy texture without all the extra fat and calories.
Here’s how to cook chicken livers in an air fryer + how to store and reheat them!
Contents
How to Cook Chicken Livers in an Air Fryer?
Here’s a guide on how to cook chicken livers in an air fryer perfectly every time:
1. Preparing Chicken Livers:
Fresh chicken livers can be found in many grocery store chains, conveniently packaged in the meat section and served by the pound.
1. Clean & Trim Your Livers
The first step in preparing your chicken livers is to clean them thoroughly.
Rinse each liver under cold running water and pat dry with paper towels.
Once they’re clean, trim off any fat or sinewy bits from the outside of the livers, as these can cause an unpleasant texture when cooked.
2. Marinate & Season:
Once your livers are trimmed and ready to go, it’s time to marinate them.
You can use your favorite marinade or just season with herbs and spices of your choice.
To ensure perfect taste and texture no matter the dish being prepared, these livers are pre-brined with a mixture of buttermilk to remove impurities and hot sauce for flavor.
Once brined, it is time to season them with either creole or Italian seasoning to your liking depending on what dish you’re looking to prepare.
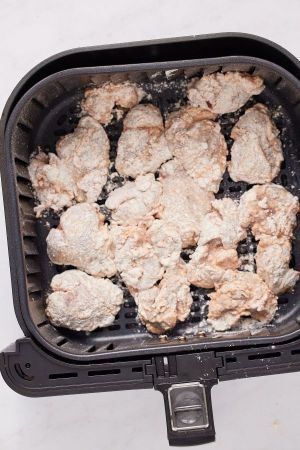
Finishing off, they are then lightly coated with all-purpose flour before being fried – allowing for restaurant-quality meals right at home!
Cooking Chicken Livers in an Air fryer:
- Step 1: Preheat your air fryer to 400 degrees Fahrenheit.
- Step 2: Cut your chicken livers into small pieces. This will help them cook evenly.
- Step 3: Place the chicken livers in the air fryer basket and cook for eight minutes.
You can season your chicken livers with salt, pepper, or your favorite spices.
Can I Prep Air Fryer Chicken Livers Ahead of Time?
Yes, you can prep chicken livers ahead of time!
Just follow steps 1-3 and then store the livers in an airtight container in the fridge.
When you’re ready to cook, simply remove them from the fridge and cook according to step 4. Easy peasy!
Should Chicken Livers Be Washed Before Air Frying?
Yes, you should always make sure to thoroughly wash chicken livers before air frying.
This will help remove any potential bacteria and ensure your meal is safe to eat.
Once the livers are washed, be sure to pat them dry with a paper towel before continuing with the recipe.
Why Are My Air Fryer Chicken Livers Undercooked?
If your air fryer chicken livers are undercooked, it may be because you did not cook them for long enough.
Be sure to check the internal temperature of the livers before serving and adjust cook time as needed. If you find that your livers are still not cooked through after eight minutes, try increasing the cooking time by a few minutes until they reach a safe internal temperature.
Additionally, you may want to try preheating your air fryer for longer than the recommended time before adding your livers to ensure even cooking.
How to Reheat Chicken Livers in an Air Fryer?
To reheat your chicken livers in an air fryer, preheat the air fryer to 350 degrees Fahrenheit.
Place the livers in the air fryer basket and cook for four to five minutes.
This should be enough time to heat them through without drying them out.
How Long Does It Take to Cook Chicken Livers in the Air Fryer?
Air frying chicken livers takes about eight minutes.
However, this may vary slightly depending on the size of your livers and the temperature of your air fryer.
To be sure your livers are fully cooked, you should use a meat thermometer to check that they reach an internal temperature of 165 degrees Fahrenheit.
How to Store Air-Fried Chicken Livers?
We will give you some tips on how to store air-fried chicken livers so that they stay fresh and delicious for as long as possible.
1. Keep Them Cool
One of the most important things to remember when storing chicken livers is to keep them cool. Heat causes chicken livers to spoil quickly, so it is important to store them in a cool, dry place. A good way to keep your chicken livers cool is to store them in the refrigerator or freezer.
If you are planning on eating them within a few days, the fridge is fine.
However, if you want to keep them for longer, we recommend storing them in the freezer.
2. Freeze Them Properly
If you choose to freeze your chicken livers, it is important to do so properly.
- First, make sure that the livers are completely cooled before placing them in the freezer. If they are even slightly warm, they will spoil more quickly when frozen.
- Second, wrap the livers tightly in plastic wrap or aluminum foil. This will help to prevent freezer burn and keep the livers fresh for longer.
- Finally, label the package with the date so that you know when they were frozen and can use them before they go bad.
3. Use Them Within 2 Months
Even when stored properly in the refrigerator or freezer, chicken livers will only last for 2-3 months before they start to spoil.
So, if you have a large number of chicken livers that you need to store, we recommend using them within 2 months for best results.
After 2 months, the quality of the livers will start to decline and they may not be as safe or delicious to eat.
4. Don’t Refrigerate Cooked Livers
If you have already cooked your chicken livers, do not try to store them in the refrigerator or freezer. cooked chicken livers will only last for 3-4 days in the fridge and 1-2 months in the freezer.
Instead of refrigerating or freezing cooked chicken livers, we recommend eating them within a few days or reheating them before eating.
5. Know When They’ve Gone Bad
Even when stored properly, chicken livers will eventually go bad and become unsafe to eat. There are a few signs that you can look for to tell if your chicken livers have gone bad:
* The color has changed from red or pink to brown or gray.
* The texture has changed from smooth to gritty.
* There is mold growing on the surface.
* The liver smells sour or unpleasant.
If you notice any of these signs, it is best to throw away the liver and get a new one. Eating spoiled chicken liver can cause food poisoning and other serious health problems.
Tips to Make Perfect Air-Fried Chicken Livers:
- Cut the chicken livers into equal pieces to ensure they cook evenly. Cut the chicken livers in similar sizes so they cook evenly. This will help them cook more evenly and prevent any under or overcooked livers.
- Don’t overcrowd the chicken livers in the air fryer basket. Place them in a single layer for the best result. If you overcrowd the basket, the livers will steam instead of fry and won’t be as crispy.
- Spray a thin layer of oil when you flip the livers halfway. This will help them crisp up nicely on both sides. The livers might pop while cooking, it’s normal. Just make sure to keep an eye on them so they don’t overcook.
- Use a quick-read thermometer to ensure that livers have reached an internal temperature of 165 degrees Fahrenheit. These air-fried chicken livers are best served immediately. If they sit for a while, they won’t be as crispy.
Conclusion:
Now that you know how to make perfect air-fried chicken livers, you can enjoy them anytime!
Cooking chicken livers in an air fryer is a quick and easy way to get a delicious and healthy meal on the table. And with just four simple steps, you can have a tasty dish ready in no time!
Just remember to cut them into even pieces, don’t overcrowd the air fryer basket, spray with oil, and use a quick-read thermometer to check doneness. And if you want perfectly crispy livers, be sure to serve them immediately after cooking.
Amazon and the Amazon logo are trademarks of Amazon.com, Inc, or its affiliates.
